
The Perfect Pie Crust – Flaky, buttery, and foolproof! This perfect pie crust recipe is easy to make, rolls out beautifully, and bakes up golden and crisp every time.

A homemade pie crust can make all the difference, and this recipe proves just how easy it can be.
Buttery, flaky, and perfectly tender, it’s the ultimate foundation for any pie, sweet or savoury. Whether you’re making a classic apple pie, a creamy pumpkin filling, or a rich quiche, this crust delivers every time.
With just a few simple ingredients and a little technique, you’ll have a pie crust that rolls out smoothly and bakes up golden and crisp.
Once you make it from scratch, you’ll never want to go back to store-bought again.
Looking for the perfect pie filling? Check out my Homemade Cherry Pie, Homemade Blueberry Pie, and my Homemade Apple Galette.
Check out my Fudgy Brownie Pie that uses one of the crusts. ↓

Ingredients you’ll need
- Plain/all-purpose flour: The base of the crust that gives it structure and a tender crumb. It creates the perfect balance between flaky and sturdy.
- Caster/granulated sugar: Adds a subtle sweetness that enhances flavour and helps the crust brown beautifully in the oven.
- Salt: Essential for balancing flavour and bringing out the buttery richness of the crust.
- Unsalted butter: The star ingredient that creates those irresistible flaky layers. Keeping it cold is key to achieving the perfect texture.
- Ice cold water: Helps bring the dough together without making it sticky. The cold temperature keeps the butter from melting too soon, ensuring a tender, flaky crust.
Find the measurements and full recipe below!
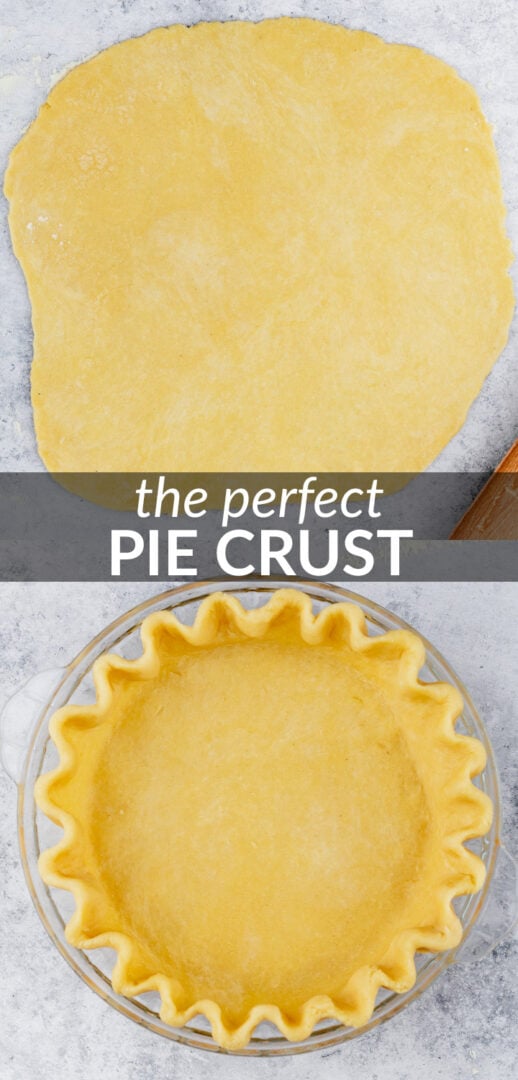
How to make
the perfect pie crust
To make this crust, simply grab a large mixing bowl and whisk together the flour, sugar, and salt.

Using a pastry cutter or food processor, cut the butter into the flour until the mixture resembles coarse breadcrumbs with pea-sized pieces.


Add the water, 1 tablespoon at a time, mixing after each addition until a crumbly dough starts to come together.
NOTE: If using a food processor, do not process to the point that a large ball of dough is formed. The dough should be quite crumbly with large clumps, and should stick together when you press a piece between your fingers.

Transfer the dough to a lightly floured surface and gather into a ball. Divide the dough in half and shape each half into a 1-inch thick disc.

Wrap tightly in clingfilm and refrigerate for at least 1 hour before use.
The printable recipe card with the full list of ingredients, their measurements, and instructions can be found at the bottom of this post.
NOTE: For best results, I highly recommend using the gram measurements (with a digital scale), rather than the cup measurements. Cup measurements are simply not accurate enough, and I cannot guarantee the best results if you use them.

How to Blind Bake
There are a few reasons why you would need to blind bake your pie crust.
- If you’re making a no-bake pie, you’ll need to fully blind bake your crust.
- If your crust needs longer to bake than the filling, you will need to partially blind bake the crust first.
Here’s how to blind bake!
On a lightly floured surface, roll the dough out into a 12-inch circle, then gently place into a 9-inch pie dish.

Tuck the excess dough under the crust edge and mold together to form a thicker outer crust. Crimp the edges with a fork or your fingers.

Refrigerate for at least 30 minutes, then preheat the oven to 190C/375F/Gas 5.
Line the chilled pastry crust loosely with parchment paper, and fill almost to the top with baking beans. Make sure they’re fully distributed over the entire surface.

Bake for 15 – 20 minutes or until the edges of the crust are starting to brown. Remove the paper and baking beans, and prick holes all over the base with a fork.

TIP: Pricking holes in pie crust is called “docking” and helps prevent the crust from puffing up in the oven. I like to use a combination of using baking beans to prevent the sides of the crust shrinking during the first part of baking, then docking the base to prevent puffing up too much during the last part of baking.
To partially bake the crust: Bake for a further 7 – 8 minutes until the bottom crust is just starting to brown. Proceed with your pie recipe by adding the filling and finish baking.
To fully bake the crust: Bake for a further 15 minutes until the bottom crust is golden brown. Allow to cool completely on a wire rack.

Recipe FAQs
Keep everything as cold as possible, especially the butter and water. Cold butter creates steam pockets as it bakes, which form those delicious flaky layers.
This can happen if the dough is too cold. Let it rest at room temperature for a few minutes to soften slightly.
That depends on your filling. For no-bake or custard pies, blind baking helps keep the crust crisp. For fruit or baked fillings, you can skip it unless the recipe says otherwise.
Shrinking usually happens if the dough wasn’t chilled long enough or if it was stretched while fitting into the pan. Chill the crust before baking and gently ease it into place instead of stretching it.
Did You Make This Recipe?
Leave a ⭐️ review! I’d love to see your take on it — snap a photo and tag me on Instagram or Facebook with #simplybakeblog!

TRY THESE
Pie recipes
Craving more sweet treats? Subscribe to my newsletter to receive recipe updates straight to your inbox. You can also keep up to date on Facebook, Pinterest, and Instagram.
Originally Published: July, 2017 | Updated: October, 2025


The Perfect Pie Crust
Ingredients
- 2 ½ cups (312g) plain/all-purpose flour
- 2 tablespoons caster/granulated sugar
- 1 teaspoon salt
- 1 cup (226g) unsalted butter, cold and cubed
- 6 – 8 tablespoons ice cold water
Instructions
- In a large mixing bowl, whisk together the flour, sugar, and salt.
- Using a pastry cutter or food processor, cut the butter into the flour until the mixture resembles coarse breadcrumbs with pea-sized pieces.
- Add the water, 1 tablespoon at a time, mixing after each addition until a crumbly dough starts to come together.
- NOTE: If using a food processor, do not process to the point that a large ball of dough is formed. The dough should be quite crumbly with large clumps, and should stick together when you press a piece between your fingers.
- Transfer the dough to a lightly floured surface and gather into a ball. Divide the dough in half and shape each half into a 1-inch thick disc.
- Wrap tightly in clingfilm and refrigerate for at least 1 hour before use.
Recipe Notes
Nutrition Information:
Nutrition information is automatically calculated, so should only be used as an approximation.
I love this recipe, but I made a cherry pie with it and the bottom crust didn’t bake. Do you have any suggestions.
Hi Samantha! If you check out my Cherry Pie recipe, you’ll see I mention placing my pie dish onto a baking tray when putting it in the oven. The baking tray becomes hot and helps to bake the pie crust underneath. I hope that helps! 🙂
Marsha, what kind of cherries did you use? Bing? Will it have a sweet/sour taste like the store bought versions? I am an experienced cook/baker and recently read an article stating the cherry makes the difference in the flavor. I’m definitely trying this soon! Thanks!
You can use any you fancy! Some even use a combination of both sweet and tart cherries. Either work beautifully in this pie 🙂